

Lorem ipsum dolor sit amet, consectetur adipiscing elit. Donec sit amet nibh. Vivamus non arcu. Lorem ipsum dolor sit amet, consectetur adipiscing elit. Etiam dapibus, tellus ac ornare aliquam, massa diam tristique urna, id faucibus lectus erat ut pede. Maecenas varius neque nec libero laoreet faucibus. Phasellus sodales, lectus sed vulputate rutrum, ipsum nulla lacinia magna, sed imperdiet ligula nisi eu ipsum. Donec nunc magna, posuere eget, aliquam in, vulputate in, lacus. Sed venenatis. Donec nec dolor vitae mauris dapibus ullamcorper. Etiam iaculis mollis tortor.
In erat. Pellentesque erat. Mauris vehicula vestibulum justo. Cum sociis natoque penatibus et magnis dis parturient montes, nascetur ridiculus mus. Nulla pulvinar est. Integer urna. Pellentesque pulvinar dui a magna. Nulla facilisi. Proin imperdiet. Aliquam ornare, metus vitae gravida dignissim, nisi nisl ultricies felis, ac tristique enim pede eget elit. Integer non erat nec turpis sollicitudin malesuada. Vestibulum dapibus. Nulla facilisi. Nulla iaculis, leo sit amet mollis luctus, sapien eros consectetur dolor, eu faucibus elit nibh eu nibh. Maecenas lacus pede, lobortis non, rhoncus id, tristique a, mi. Cras auctor libero vitae sem vestibulum euismod. Nunc fermentum.
Mauris lobortis. Aliquam lacinia purus. Pellentesque magna. Mauris euismod metus nec tortor. Phasellus elementum, quam a euismod imperdiet, ligula felis faucibus enim, eu malesuada nunc felis sed turpis. Morbi convallis luctus tortor. Integer bibendum lacinia velit. Suspendisse mi lorem, porttitor ut, interdum et, lobortis a, lectus. Phasellus vitae est at massa luctus iaculis. In tincidunt.
Integer fermentum elit in tellus. Integer ligula ipsum, gravida aliquet, fringilla non, interdum eget, ipsum. Praesent id dolor non erat viverra volutpat. Fusce tellus libero, luctus adipiscing, tincidunt vel, egestas vitae, eros. Vestibulum mollis, est id rhoncus volutpat, dolor velit tincidunt neque, vitae pellentesque ante sem eu nisl. Donec facilisis, magna eget elementum pellentesque, augue arcu aliquet eros, eget convallis mauris ante quis magna. Pellentesque habitant morbi tristique senectus et netus et malesuada fames ac turpis egestas. Aenean et libero. Nam aliquam. Quisque vitae tortor id neque dignissim laoreet. Duis eu ante. Integer at sapien. Praesent sed nisl tempor est pulvinar tristique. Maecenas non lorem quis mi laoreet adipiscing. Sed ac arcu. Sed tincidunt libero eu dolor. Cras pharetra posuere eros. Donec ac eros id diam tempor faucibus. Fusce feugiat consequat nulla. Vestibulum tincidunt vulputate ipsum.
Nullam eget neque. Nullam imperdiet venenatis ligula. Integer a leo. Nunc consectetur. Maecenas sem. Proin vulputate, massa vel volutpat laoreet, purus erat pretium ligula, eget varius arcu nibh sed libero. Fusce ante. Nullam interdum aliquet metus. Ut ultrices vestibulum tellus. Praesent quis erat. Nam id turpis sit amet neque cursus luctus. Cum sociis natoque penatibus et magnis dis parturient montes, nascetur ridiculus mus. Quisque id tortor. In vitae sapien. Nunc quis tellus.
Every RocketTheme template is accompanied by custom content styles known as Typography. This guide outlines how to use Typography in your content.
Typography - RokCandy Mode
All the typography in the template is using RokCandy syntax which is outlined at the RokCandy Examples page. In this guide, we will use the Attention Span Style, which uses the [div class="attention" class2="typo-icon"]...[/div] syntax.
- Login to the Joomla administrator
- Go to Content → Article Manager; or, if you wish to use the syntax in custom modules, Go to Extensions → Module Manager
- Choose the Article, or Custom Module
- Insert [div class="attention" class2="typo-icon"] .... some content .... [/div]
- Save
As RokCandy is not affected by the stripping functions of the WYSIWYG editor, you can insert the RokCandy snippets without any issue. If you are in HTML mode, the snippets will still function.
Typography - HTML Mode
Every RokCandy typographical element can be used in its HTML form as outlined at the HTML Examples page. HTML typography allows for more custom control in the article but requires an additional step. In this guide, we will use the Attention Span Style, which uses the <div class="attention"><div class="typo-icon">...</div></div> syntax.
Content Editor
- Login to the Joomla administrator
- Go to Content → Article Manager; or, if you wish to use the syntax in custom modules, Go to Extensions → Module Manager
- Choose the Article, or Custom Module
- Click the HTML mode or equivalent in your editor
- Insert <div class="attention"><div class="typo-icon"> ... some content ... </div></div>
- Save
No Editor
- Login to the Joomla administrator
- Go to Content → Article Manager; or, if you wish to use the syntax in custom modules, Go to Extensions → Module Manager
- Choose the Article, or Custom Module
- Insert <div class="attention"><div class="typo-icon"> ... some content ... </div></div>
- Save
Note, with the Content Editor (WYSIWYG) enabled, you need to enter HTML mode otherwise the typography will not work. If you are running no editor, this is not the case as you are interacting with the content at a code level.
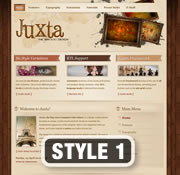
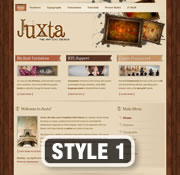
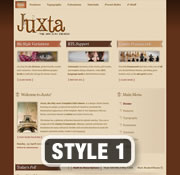
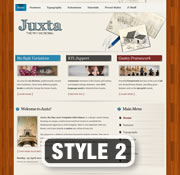
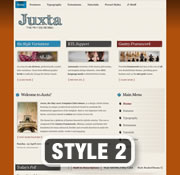
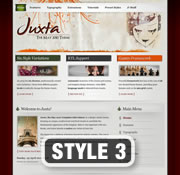
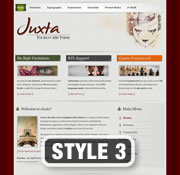
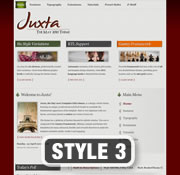
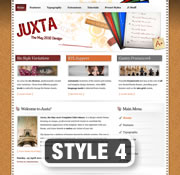
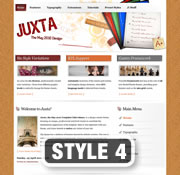
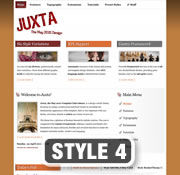
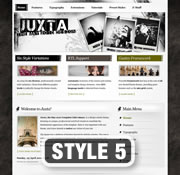
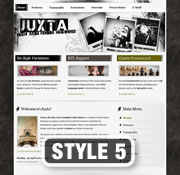
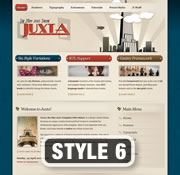
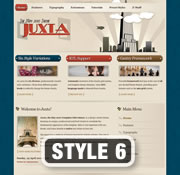
Juxta has 6 preset styles / style variations. You can edit the presets of the template as outlined on the Style Control page.
Below is a preview / screenshot of each style variation, in sequential order, Preset 1 - Preset 6. Please click on the image to load a live example of each style variation.
High
Medium
Low


The following tutorial outlines how to edit the logo with Adobe® Fireworks CS4. Fireworks is required for logo editing. CS3 can be used for image source editing.
Logo Editing Video Tutorial
Learn how to customise your Juxta logo using Adobe® Fireworks with this detailed video tutorial.Editing in Adobe® Fireworks CS4
Step 1
Open the logo-source.png file in Adobe® Fireworks.
Focus on the right column, titled Layers. Select the Web layers directory and click the eye icon to the left of the logo slice (the green object). This will make the slice invisible so you can edit the file.
Step 2
Double click on the logo text. Now you can edit the text of logo to your choosing.
Next, double click on the slogan logo text. Now you can edit the text of logo to your choosing. Repeat for the underlying slogan text.
Step 3
Reactivate the Slice in the Web Layers column, this will place a green rectangle over the logo image. Change the size of the slice (or move it) to match the new size if applicable.
Step 4
Now you will want to export the logo. Right click on the image slice and select Exported Selected Slices... from the contextual menu. Proceed to export it to your computer for uploading.
Step 5
If you are new to Fireworks, you may be wondering why it appears that there is only one style variation in the source. This is not the case as we take advantage of the Frame features of Fireworks. You need to simply switch frames to see all the other style variation sources.
There are a few ways to change frames and we will show 2 methods that you can use.
In the right column where you find the Layers toolbar including the Web Layers area, you should see another tab/toolbar named Frames. Just left click on the title Frames to enter the frames area. Then you can click on either of the frames which are named to show which style variant is on that particular frame.
The second method is the easiest and simplest. At the bottom of the Fireworks canvas is a row of buttons and arrows. Select the arrows to switch between frames.
Uploading the changed files
Step 1
Once you have successfully edited then exported your new logo, you will need to upload it to your server. This process is best done via a FTP client such as Filezilla
- Open your FTP client on your local computer.
- Login to your web server where Juxta is installed.
- Navigate to the /templates/rt_juxta_j15/images/logo/*style/ directory.
- Upload logo.png (and any other logo related images) to this directory (You may need to browse on the local panel in the FTP client to find where you have exported your logo).
- Clear your browser cache before viewing such as using the keyboard commands on Windows, Ctrl+F5.